Datawhale干货
作者:宋志学,Datawhale成员
前言
2023年12月11日,Mistral AI团队发布了一款高质量的稀疏专家混合模型Mixtral 8x7B。
Mistral AI继续致力于向开发者社区提供最优秀的开放模型。在人工智能领域向前发展,需要采取超越重用众所周知的架构和训练范式的新技术路径。最重要的是,它需要让社区从原创模型中受益,以促进新的发明和用途。
Mixtral 8x7B是一款高质量的稀疏专家混合模型(SMoE),具有开放权重。采用Apache 2.0开源软件许可证。Mixtral在大多数基准测试中表现超过了Llama 2 70B,推断速度快6倍。它是目前拥有宽松许可证最强大的开放权重模型,并在成本/性能权衡方面是最佳模型。特别是在大多数标准基准测试中,它的表现匹配或超过了GPT3.5。
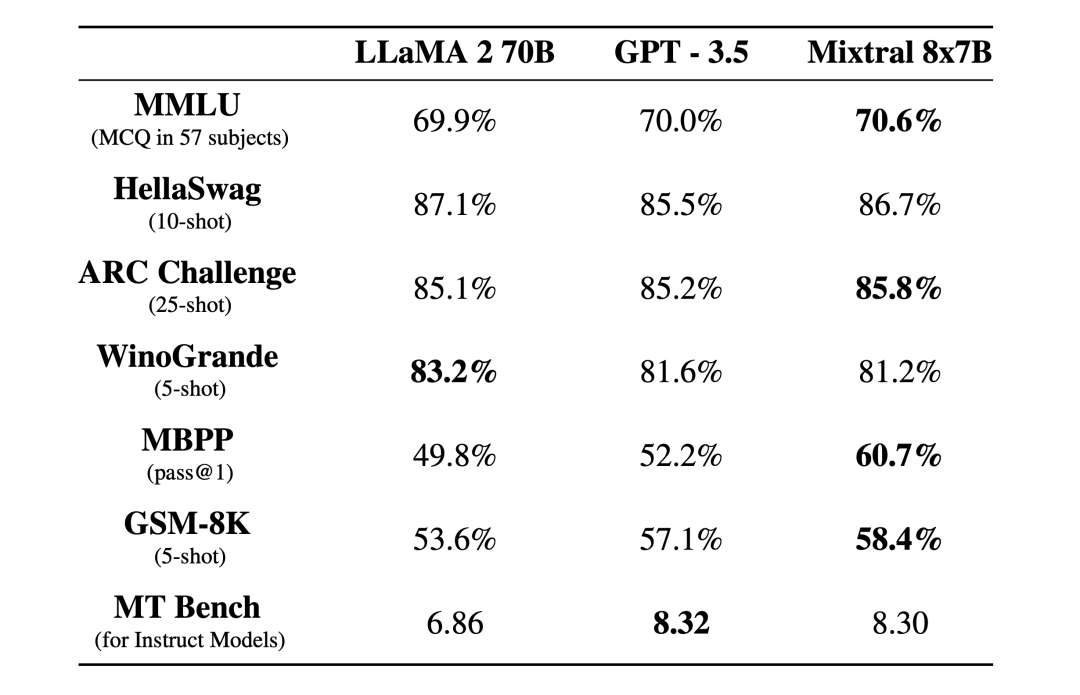
Mixtral具有以下特点:
- 优雅地处理32k标记的上下文。
- 支持英语、法语、意大利语、德语和西班牙语。
- 在代码生成方面表现出色。
- 可以微调为一个遵循指令的模型,在MT-Bench上达到8.3的分数。
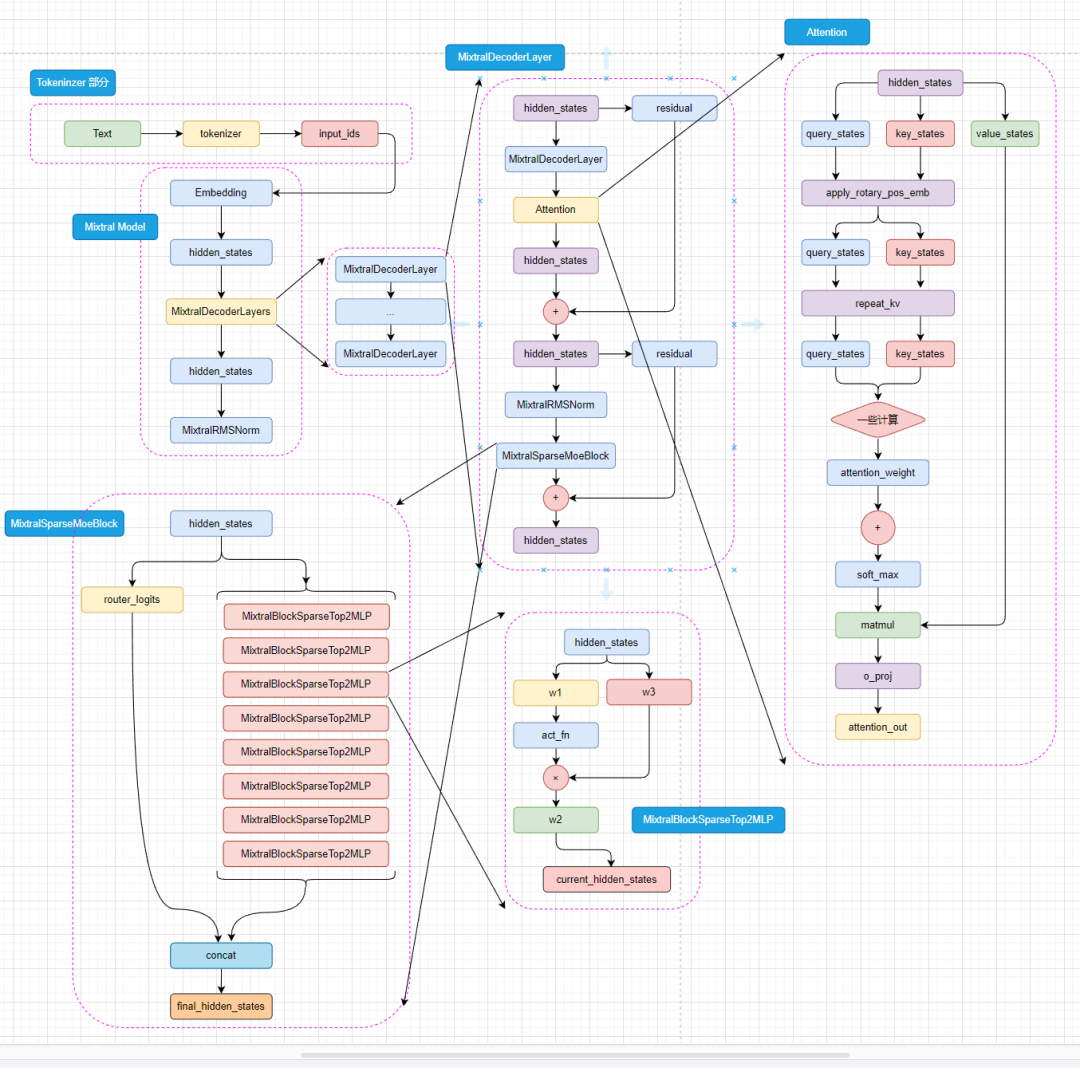
在 transformers 仓库中可以看到 mixtral 的源码,首先是 MixtralModel 类,继承自 PreTrainedModel ,这个类是所有模型的基类,包含了一些通用的方法,比如保存模型、加载模型、初始化权重等。具体目录是:srctransformersmodelsmixtralmodeling_mixtral.py
继承关系为:MixtralModel -> MixtralPreTrainedModel -> PreTrainedModel
MixtralConfig
MixtralConfig 类继承自 PretrainedConfig ,这个类是所有配置类的基类,包含了一些通用的方法,比如保存配置、加载配置、初始化配置等。具体路径在 transformers 仓库的 srctransformersmodelsmixtralconfiguration_mixtral.py目录下。
可以使用如下代码直接创建模型的config对象:
config = MixtralConfig()
MixtralModel
MixtralModel 初始化
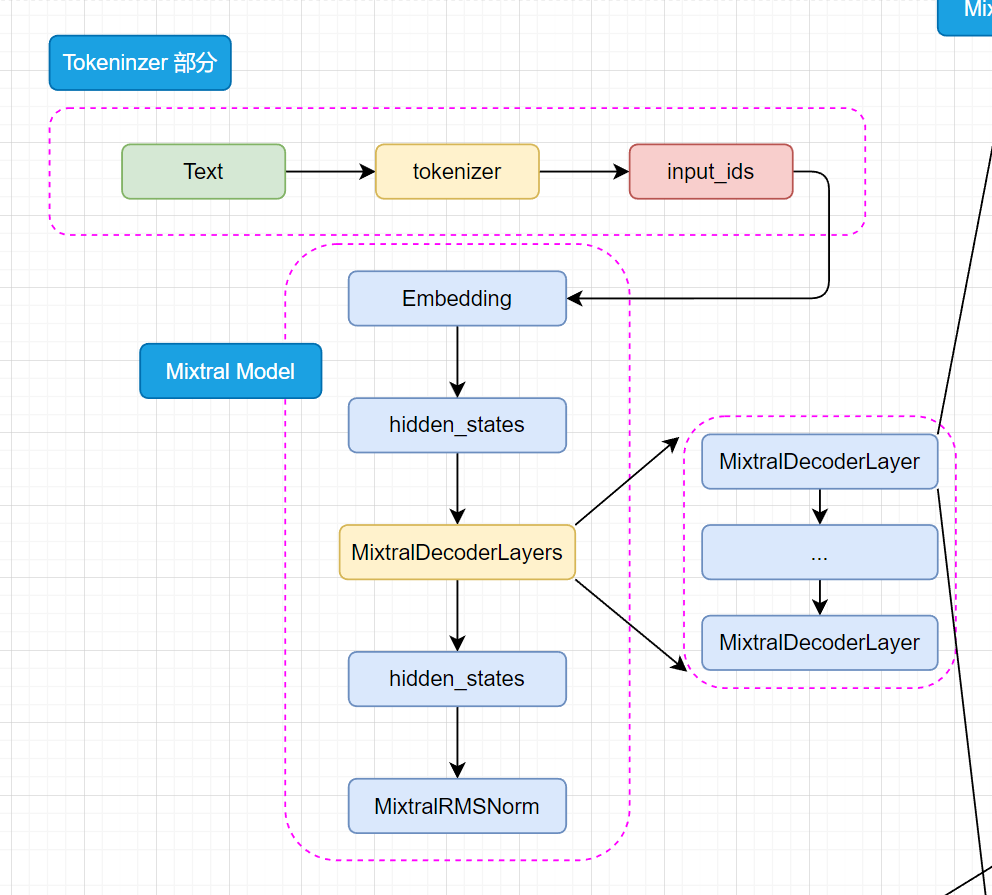
如果你看过我上一篇 LLaMA开源大模型源码分析!的话,就会发现这里的初始化和llama模型的初始化非常相似,都是先初始化embed_tokens,然后初始化layers,最后初始化norm。
- 设置了模型的两个属性:padding_idx(用于指定填充标记的索引),vocab_size(词汇表的大小)
- 初始化了模型的嵌入层、解码器层、归一化层
- 嵌入层(nn.Embedding):模型使用嵌入层将输入的标记映射成密集的向量表示。
- 解码器层(nn.ModuleList()):模型包含多个解码器层,这些层都是由 MixtralDecoderLayer 定义
- 归一化层 MixtralRMSNorm:归一化层使用的是 Root Mean Square Layer Normalization(RMS Layer Norm),和llama使用的是一样的。
- 设置了是否使用 gradient_checkpoint 主要是用来节省显存
- 调用 post_init() 完成一些初始化和准备检查的代码
class MixtralModel(MixtralPreTrainedModel):
    """
    Transformer decoder consisting of *config.num_hidden_layers* layers. Each layer is a [`MixtralDecoderLayer`]
Args:
config: MixtralConfig
“””
def __init__(self, config: MixtralConfig):
super().__init__(config)
self.padding_idx = config.pad_token_id
self.vocab_size = config.vocab_size
self.embed_tokens = nn.Embedding(config.vocab_size, config.hidden_size, self.padding_idx)
self.layers = nn.ModuleList(
[MixtralDecoderLayer(config, layer_idx) for layer_idx in range(config.num_hidden_layers)]
)
self._attn_implementation = config._attn_implementation
self.norm = MixtralRMSNorm(config.hidden_size, eps=config.rms_norm_eps)
self.gradient_checkpointing = False
# Initialize weights and apply final processing
self.post_init()
可以看一下 post_init() 的代码,主要是初始化权重和gradient_checkpointing相关的一些事情。该方法在PreTrainedModel基类中,transformers中所有模型基本都继承这个类。
def post_init(self):
    """
    A method executed at the end of each Transformer model initialization, to execute code that needs the model's
    modules properly initialized (such as weight initialization).
    """
    self.init_weights()
    self._backward_compatibility_gradient_checkpointing()
MixtralModel Forward
forward 部分的代码有点长,但其实大部分都是张量并行或者是节省显存相关的代码,对于理解模型结构来说可以直接忽略。
首先进来就是把 inputs_ids 进行向量化,然后拿到 hidden_states 。然后是存起来所有的hidden_states 进入 decoder_layer 再拿一个 hidden_states,作为下一轮 decoder_layer 的 hidden_states 输入,最后给 hidden_states norm一下。如下代码所示:
# 向量化
inputs_embeds = self.embed_tokens(input_ids)
hidden_states = inputs_embeds
for decoder_layer in self.layers:
#存起来所有的 hidden_states
if output_hidden_states:
all_hidden_states += (hidden_states,)
# 这里是decoder_layer 的forward
layer_outputs = decoder_layer(
hidden_states,
attention_mask=attention_mask,
position_ids=position_ids,
past_key_value=past_key_values,
output_attentions=output_attentions,
output_router_logits=output_router_logits,
use_cache=use_cache,
)
# # 再拿一个 hidden_states,作为下一轮 decoder_layer 的 hidden_states 输入
hidden_states = layer_outputs[0]
# norm 一下
hidden_states = self.norm(hidden_states)
MixtralDecoderLayer
MixtralDecoderLayer 初始化
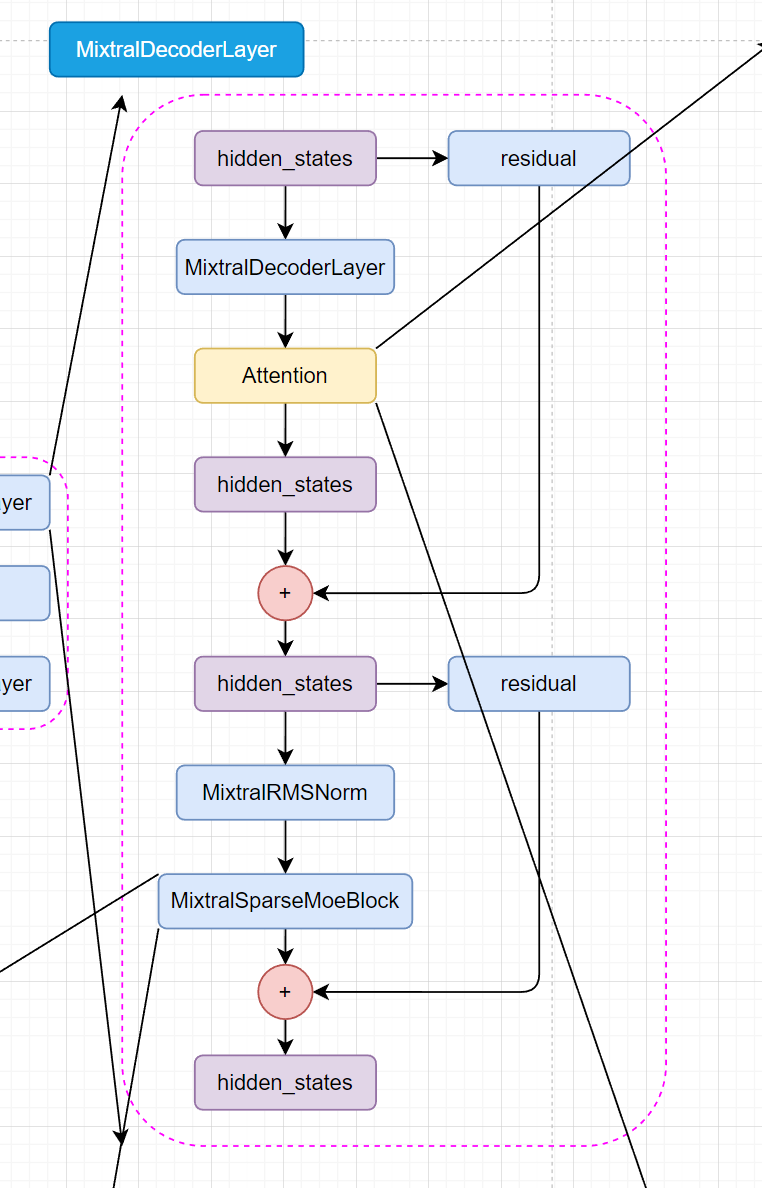
好,来到了 moe 模型和 llama 模型最大区别的地方了,Mixtral 使用 MixtralSparseMoeBlock 模块代替了原有的 MLP 层, MLP 层还是在的,待会在后面我们再说。先来看初始化部分 DecoderLayer 做了什么事情。
hidden_size: 也就是在上面说的输入输出。self_attn: 别看它写这么多啊,其实就是选一下用什么attention。看见大写字母不要怕,直接点进去看看怎么个事!
MIXTRAL_ATTENTION_CLASSES = {
    "eager": MixtralAttention,
    "flash_attention_2": MixtralFlashAttention2,
    "sdpa": MixtralSdpaAttention,
}
block_sparse_moe:moe稀疏矩阵,这个待会后面再说,输入输出都是hidden_size大小。input_layernorm:MixtralRMSNorm层,输入时候的normpost_attention_layernorm: 丢入稀疏矩阵block_sparse_moe之前的操作。
class MixtralDecoderLayer(nn.Module):
    def __init__(self, config: MixtralConfig, layer_idx: int):
        super().__init__()
        self.hidden_size = config.hidden_size  # 隐藏层的大小

        self.self_attn = MIXTRAL_ATTENTION_CLASSES[config._attn_implementation](config, layer_idx)  # 自注意力机制

        self.block_sparse_moe = MixtralSparseMoeBlock(config)  # 稀疏混合块
        self.input_layernorm = MixtralRMSNorm(config.hidden_size, eps=config.rms_norm_eps)  # 输入层归一化
        self.post_attention_layernorm = MixtralRMSNorm(config.hidden_size, eps=config.rms_norm_eps)  # 注意力之后的层归一化
MixtralDecoderLayer Forward
首先复制一份 hidden_states 给 residual。然后 hidden_states 进入 input_layernorm 进行norm。
然后进入 self_attn 进行 attention 操作,拿到 hidden_states、self_attn_weights、present_key_value。
而后 hidden_states 和 residual 相加,得到 hidden_states。此时再复制一份 residual 。然后 hidden_states 进入 post_attention_layernorm 进行norm。
来了,来了!这里 hidden_states 进入稀疏矩阵 block_sparse_moe 得到 hidden_states, router_logits ,hidden_states 和 residual 相加,得到 hidden_states。最后输出 hidden_states。
residual = hidden_states
hidden_states = self.input_layernorm(hidden_states)
hidden_states, self_attn_weights, present_key_value = self.self_attn(
hidden_states=hidden_states,
attention_mask=attention_mask,
position_ids=position_ids,
past_key_value=past_key_value,
output_attentions=output_attentions,
use_cache=use_cache,
)
hidden_states = residual + hidden_states
residual = hidden_states
hidden_states = self.post_attention_layernorm(hidden_states)
hidden_states, router_logits = self.block_sparse_moe(hidden_states)
hidden_states = residual + hidden_states
outputs = (hidden_states,)
if output_attentions:
outputs += (self_attn_weights,)
if use_cache:
outputs += (present_key_value,)
if output_router_logits:
outputs += (router_logits,)
return outputs
MixtralAttention
我们先来看 Attention 部分嗷,稀疏矩阵留到最后压轴再看。
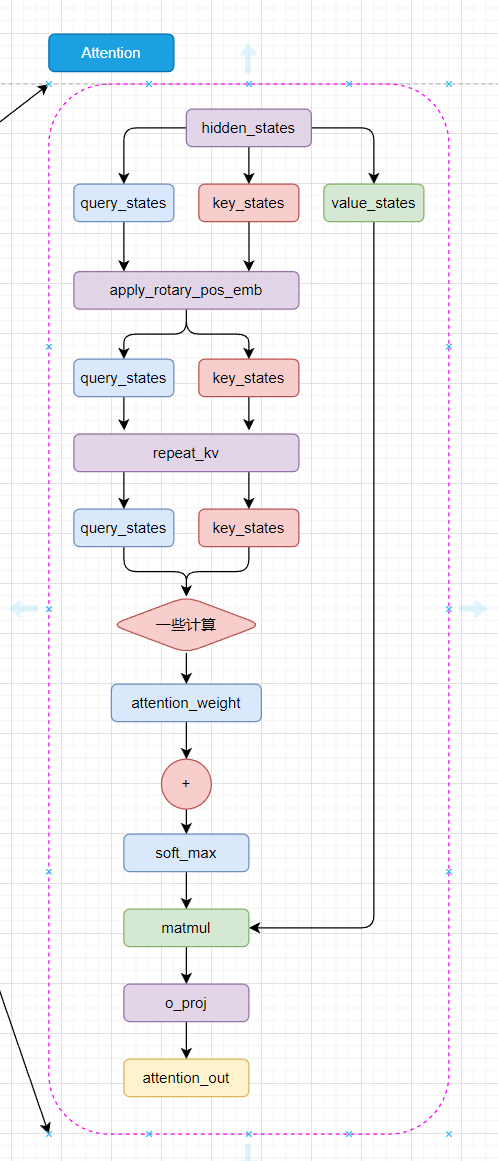
MixtralAttention 初始化
好好好,首先映入眼帘的还是 Attention Is All You Need ,不忘初心,可以可以!
先来看 init 部分叭。
layer_idx: 这个就是第几个DecoderLayers层。不用关心。attention_dropout: 用于dropout的概率。hidden_size: 输入输出大小。num_attention_heads: 多头注意力的头数。head_dim: 多头注意力的维度self.hidden_size // self.num_heads,和transformers中的一样。num_key_value_heads: 用于key和value的头数。
其他的参数都在 MixtralConfig 中有默认值,可以直接使用,也可以直接去MixtralConfig的源码中看具体的解释,这里就不再多说。
再往下就是 q_proj、 k_proj 、v_proj、 o_proj 四个矩阵(全连接层),耳熟能详了。
class MixtralAttention(nn.Module):
    """
    Multi-headed attention from 'Attention Is All You Need' paper. Modified to use sliding window attention: Longformer
    and "Generating Long Sequences with Sparse Transformers".
    """
def __init__(self, config: MixtralConfig, layer_idx: Optional[int] = None):
super().__init__()
self.config = config
self.layer_idx = layer_idx
if layer_idx is None:
logger.warning_once(
f”Instantiating {self.__class__.__name__} without passing `layer_idx` is not recommended and will “
“to errors during the forward call, if caching is used. Please make sure to provide a `layer_idx` “
“when creating this class.”
)
self.hidden_size = config.hidden_size
self.num_heads = config.num_attention_heads
self.head_dim = self.hidden_size // self.num_heads
self.num_key_value_heads = config.num_key_value_heads
self.num_key_value_groups = self.num_heads // self.num_key_value_heads
self.max_position_embeddings = config.max_position_embeddings
self.rope_theta = config.rope_theta
self.is_causal = True
self.attention_dropout = config.attention_dropout
if (self.head_dim * self.num_heads) != self.hidden_size:
raise ValueError(
f”hidden_size must be divisible by num_heads (got `hidden_size`: {self.hidden_size}“
f” and `num_heads`: {self.num_heads}).”
)
self.q_proj = nn.Linear(self.hidden_size, self.num_heads * self.head_dim, bias=False)
self.k_proj = nn.Linear(self.hidden_size, self.num_key_value_heads * self.head_dim, bias=False)
self.v_proj = nn.Linear(self.hidden_size, self.num_key_value_heads * self.head_dim, bias=False)
self.o_proj = nn.Linear(self.num_heads * self.head_dim, self.hidden_size, bias=False)
self.rotary_emb = MixtralRotaryEmbedding(
self.head_dim,
max_position_embeddings=self.max_position_embeddings,
base=self.rope_theta,
)
MixtralAttention Forward
这里的 forward 函数就是 Attention 的核心部分了,我们来一点一点看。
注意:其中有关于张量并行或者显存节省的部分我就直接省略了,直接看主要代码。这个笔记主要是分析mixtral的模型结构,并不讨论如何节省显存。
首先获取 batch_size 和 seq_len ,然后把 hidden_states 丢入 q_proj、 k_proj 、v_proj 三个矩阵,得到 query_states、 key_states 、value_states 。然后把 query_states、 key_states 、value_states reshape 为下一步计算做准备。
获取 kv_seq_len ,其实我觉得这步挺多余的,因为 kv_seq_len 就等于 self.num_key_value_heads 。
将旋转位置嵌入应用于查询和键张量。使用了旋转位置嵌入的余弦和正弦部分,将它们与查询和键张量相乘,并将结果相加,从而实现旋转位置嵌入的效果。
key_states和value_states重复self.num_key_value_groups次。然后,使用torch.matmul()函数计算query_states和转置后的key_states之间的矩阵乘法。最后,将结果除以math.sqrt(self.head_dim)进行归一化。
然后softmax 和 dropout。然后 attn_weights 和 value_states 相乘,把 attn_output reshape 为下一步计算做准备,最后把 attn_output 丢入 o_proj ,然后return就行了。
# 获取 batch_size 和 seq_len
bsz, q_len, _ = hidden_states.size()
# 把 hidden_states 丢入 q_proj、k_proj、v_proj
query_states = self.q_proj(hidden_states)
key_states = self.k_proj(hidden_states)
value_states = self.v_proj(hidden_states)
# 把 q_proj、k_proj、v_proj 的输出 reshape 为下一步计算做准备
query_states = query_states.view(bsz, q_len, self.num_heads, self.head_dim).transpose(1, 2)
key_states = key_states.view(bsz, q_len, self.num_key_value_heads, self.head_dim).transpose(1, 2)
value_states = value_states.view(bsz, q_len, self.num_key_value_heads, self.head_dim).transpose(1, 2)
# 获取 kv_seq_len,其实我觉得这步挺多余的,因为 kv_seq_len 就等于 self.num_key_value_heads
kv_seq_len = key_states.shape[-2]
# 将旋转位置嵌入应用于查询和键张量。使用了旋转位置嵌入的余弦和正弦部分,将它们与查询和键张量相乘,并将结果相加,从而实现旋转位置嵌入的效果
cos, sin = self.rotary_emb(value_states, seq_len=kv_seq_len)
query_states, key_states = apply_rotary_pos_emb(query_states, key_states, cos, sin, position_ids)
# 首先,它将key_states和value_states重复self.num_key_value_groups次。然后,使用torch.matmul()函数计算query_states和转置后的key_states之间的矩阵乘法。最后,将结果除以math.sqrt(self.head_dim)进行归一化
key_states = repeat_kv(key_states, self.num_key_value_groups)
value_states = repeat_kv(value_states, self.num_key_value_groups)
attn_weights = torch.matmul(query_states, key_states.transpose(2, 3)) / math.sqrt(self.head_dim)
# softmax + dropout
attn_weights = nn.functional.softmax(attn_weights, dim=-1, dtype=torch.float32).to(query_states.dtype)
attn_weights = nn.functional.dropout(attn_weights, p=self.attention_dropout, training=self.training)
# 然后 attn_weights 和 value_states 相乘
attn_output = torch.matmul(attn_weights, value_states)
# 然后把 attn_output reshape 为下一步计算做准备
attn_output = attn_output.transpose(1, 2).contiguous()
attn_output = attn_output.reshape(bsz, q_len, self.hidden_size)
# 最后把 attn_output 丢入 o_proj
attn_output = self.o_proj(attn_output)
# 返回 attn_output、attn_weights、past_key_value
return attn_output, attn_weights, past_key_value
MixtralSparseMoeBlock
来了,来了。MoE模型的核心,稀疏矩阵!
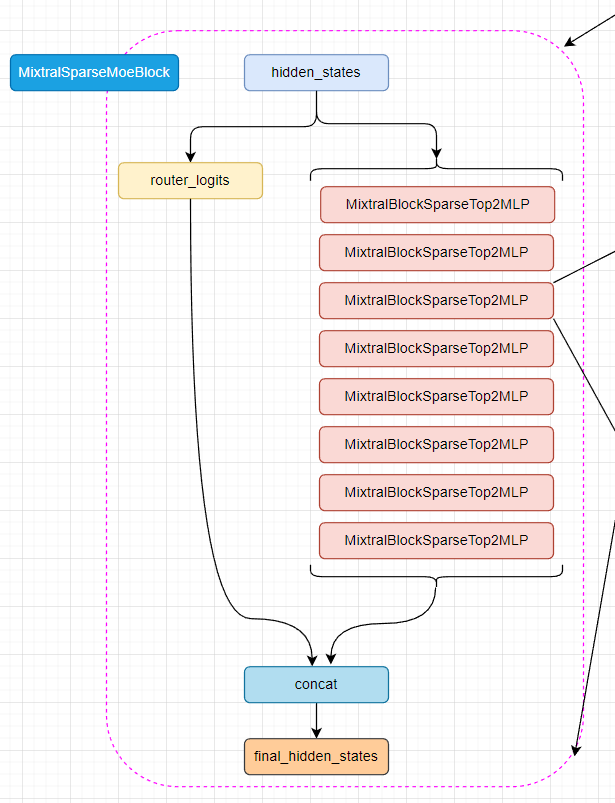
MixtralSparseMoeBlock 初始化
首先来看看在初始化中,init做了什么事情。
hidden_dim: 输入输出维度大小。ffn_dim: MLP 层的维度大小。num_experts: 本地专家的数量。top_k: 选择的专家数量。gate: 门控层,输入是hidden_dim,输出是num_experts。experts: 专家层,八个MixtralBLockSparseTop2MLP模块。(就是八个原来的MLP层)
class MixtralSparseMoeBlock(nn.Module):
def __init__(self, config):
super().__init__()
self.hidden_dim = config.hidden_size
self.ffn_dim = config.intermediate_size
self.num_experts = config.num_local_experts
self.top_k = config.num_experts_per_tok
# gating
self.gate = nn.Linear(self.hidden_dim, self.num_experts, bias=False)
self.experts = nn.ModuleList([MixtralBLockSparseTop2MLP(config) for _ in range(self.num_experts)])
MixtralSparseMoeBlock Forward
- 首先,输入的隐藏状态
hidden_states经过重塑,以适应后续处理。 - 使用门控层
gate计算出每个隐藏状态对于各个专家的重要程度,得到router_logits。 - 对
router_logits应用softmax函数,得到路由权重routing_weights。 - 从
routing_weights中选出最相关的top_k个专家,并进行归一化。 - 初始化最终的隐藏状态
final_hidden_states。 - 对每个专家进行遍历,根据专家掩码
expert_mask选出分配给当前专家的隐藏状态,经过专家层处理后,将结果累加到最终隐藏状态中。 - 最后,将最终隐藏状态的形状重塑回原始形状,并返回。
看完了稀疏矩阵的数据流向,现在你还觉得MoE模型在推理的之后只有两个模型在运行嘛?哈哈哈,其实就是八个MLP层作为专家模型,实际上所有的八个MLP层都是在运行的。
# 首先获取隐藏状态的维度信息
batch_size, sequence_length, hidden_dim = hidden_states.shape
# 将隐藏状态的形状重塑为二维,便于后续处理
hidden_states = hidden_states.view(-1, hidden_dim)
# router_logits用于计算每个专家对每个隐藏状态的重要程度
router_logits = self.gate(hidden_states)
# 使用softmax函数计算路由权重,这些权重决定每个隐藏状态分配给每个专家的比例
routing_weights = F.softmax(router_logits, dim=1, dtype=torch.float)
# 选择top_k个最相关的专家
routing_weights, selected_experts = torch.topk(routing_weights, self.top_k, dim=-1)
# 对路由权重进行归一化处理
routing_weights /= routing_weights.sum(dim=-1, keepdim=True)
# 将路由权重转换回输入数据类型
routing_weights = routing_weights.to(hidden_states.dtype)
# 初始化最终隐藏状态
final_hidden_states = torch.zeros(
(batch_size * sequence_length, hidden_dim), dtype=hidden_states.dtype, device=hidden_states.device
)
# 生成专家掩码,用于确定哪些隐藏状态分配给哪些专家
expert_mask = torch.nn.functional.one_hot(selected_experts, num_classes=self.num_experts).permute(2, 1, 0)
# 遍历所有的专家
for expert_idx in range(self.num_experts):
# 获取当前专家的处理层
expert_layer = self.experts[expert_idx]
# 找出选中当前专家的隐藏状态索引
idx, top_x = torch.where(expert_mask[expert_idx])
# 如果没有隐藏状态被分配给当前专家,则继续下一个专家
if top_x.shape[0] == 0:
continue
# 将索引转换为列表形式,以便高效处理
top_x_list = top_x.tolist()
idx_list = idx.tolist()
# 获取并处理当前专家应处理的隐藏状态
current_state = hidden_states[None, top_x_list].reshape(-1, hidden_dim)
current_hidden_states = expert_layer(current_state) * routing_weights[top_x_list, idx_list, None]
# 将计算结果累加回最终隐藏状态中
final_hidden_states.index_add_(0, top_x, current_hidden_states.to(hidden_states.dtype))
# 将最终隐藏状态的形状重塑回原始的三维形状
final_hidden_states = final_hidden_states.reshape(batch_size, sequence_length, hidden_dim)
# 返回最终的隐藏状态和路由逻辑结果
return final_hidden_states, router_logits
MixtralBLockSparseTop2MLP
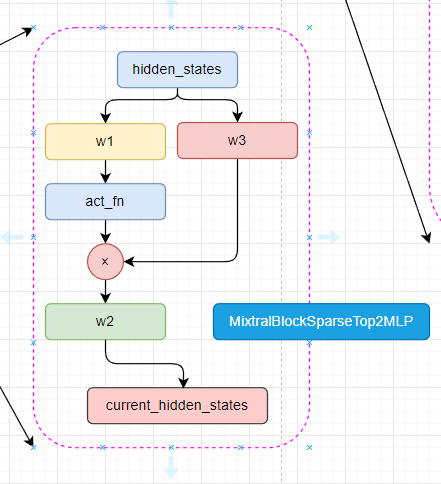
这个就是所谓的专家模型,其实就是原来的MLP层而已。
首先初始胡三个线性层和一个激活层,然后就是前向传播部分了。hidden_states 经过第一个线性层,然后经过激活层,再与经过第三个线性层的hiden_states相乘,得到current_hidden_states。
然后current_hidden_states经过第二个线性层,最后返回current_hidden_states。
class MixtralBLockSparseTop2MLP(nn.Module):
    def __init__(self, config: MixtralConfig):
        super().__init__()
        self.ffn_dim = config.intermediate_size
        self.hidden_dim = config.hidden_size
self.w1 = nn.Linear(self.hidden_dim, self.ffn_dim, bias=False)
self.w2 = nn.Linear(self.ffn_dim, self.hidden_dim, bias=False)
self.w3 = nn.Linear(self.hidden_dim, self.ffn_dim, bias=False)
self.act_fn = ACT2FN[config.hidden_act]
def forward(self, hidden_states):
current_hidden_states = self.act_fn(self.w1(hidden_states)) * self.w3(hidden_states)
current_hidden_states = self.w2(current_hidden_states)
return current_hidden_states 干货学习,点赞三连↓


 ufabet
มีเกมให้เลือกเล่นมากมาย: เกมเดิมพันหลากหลาย ครบทุกค่ายดัง


